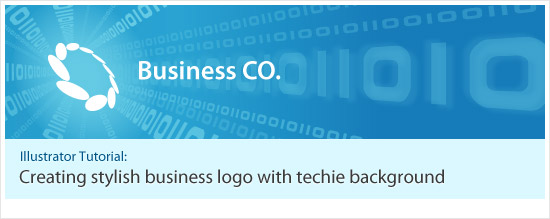
Today we are going to learn how to create a stylish business logo with techie background in Adobe Illustrator. This tutorial was actually a request by a reader early this month, but so sorry that it take so long until now I only manage to write this tutorial and post it up.
As mentioned earlier, the final outcome of this tutorial which shown above, was done by Adobe Illustrator, thanks to its powerful tools and filters. Well to do this tutorial, you need at least CS version or above, and have basic knowledge with it too. I will separate this tutorial into two part: First part is the creation of the logo while the second part is the background.
Part 1: Stylish Business Logo
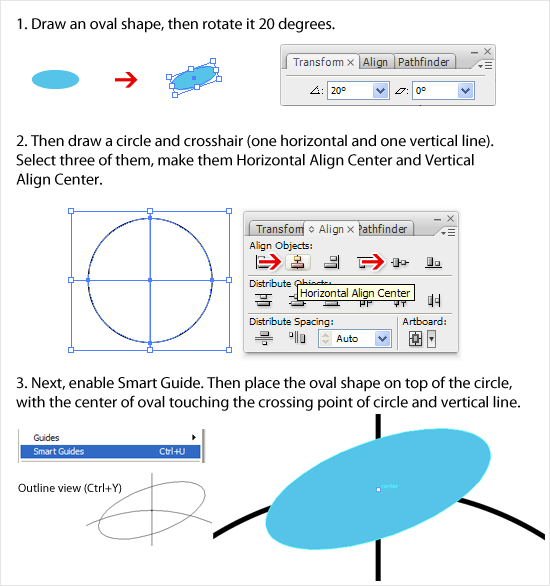
Step 1: Well from the sample picture I had from the reader, the logo was created by a series of oval shapes that formed into a circle. So by using Ellipse Tool, create an oval shape, then rotate it about 20 degrees. Apply any color as you like but in this tutorial, I use #5BC1E5.
Step 2: Then we need to create some guidelines for the oval to travel in circle precisely. First, we create a circle and one vertical line and one horizontal line. Select three of them, open up Align Palette and hit Horizontal Align Center and Vertical Align Center. This step is to find out the center rotate point for the oval shape.
Step 3: To make things easier, please enable Smart Guides (Ctrl+U). Then, we place the blue oval shape on top of the circle, with the center point of oval touching the crossing point of the circle guide and vertical line.
Tip: You can use outline view (Ctrl+Y) and zoom in further for more precise result
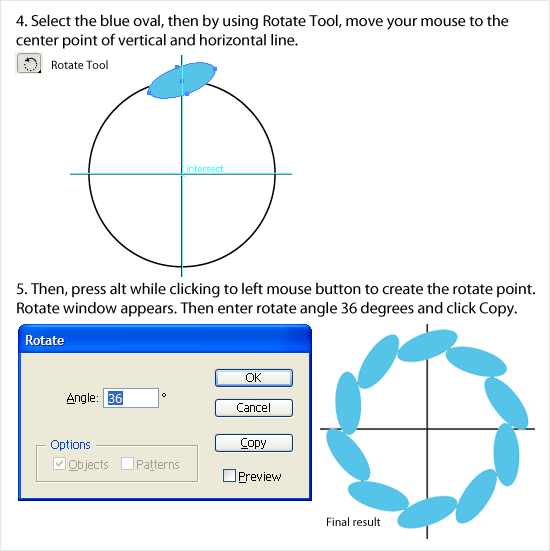
Step 4: Now we will duplicate and rotate the oval to form the business logo. First, select the blue oval and then select Rotate Tool at the Toolbar. With the help from Smart Guides and guidelines created just now, move your mouse to locate the center point of the guidelines, shown in picture below.
Step 5: As soon you found the center point, press Alt while hitting left mouse button. The rotate point of the blue oval shape has just set by you. A Rotate window should pop up. According to the sample picture, the logo consists of 10 ovals, so we need to rotate 9 times with angle 36 degrees. So in the Angle field, enter 36 and select Copy. A new oval is duplicated. Then duplicate the process again by hitting Ctrl+D 8 times. You should have the similar final result as picture below.
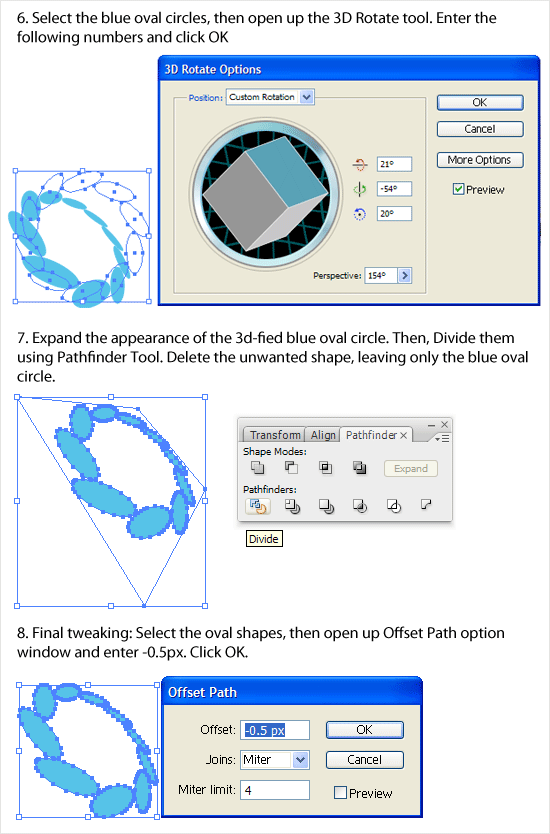
Step 6: Now we need to 3D rotate it. Remove the guidelines and select all and group the ovals, then open up the 3D Rotate Tool. Enter the numbers like picture below and click ok.
Step 7: Once satisfy with the 3D rotation, expand it (Object > Expand Appearance). Because the current logo is all stick together, so we have to divide them by using Pathfinder’s Divide Tool. After Divide, delete the unwanted shapes that does not belongs to the logo.
Step 8: Now we will make the final tweaking to the logo: to make them slightly smaller so that to have a little more gap between them. To achieve this, we use Offset Path (Object > Path > Offset Path). Enter Offset number -0.5px and hit OK. A new smaller ovals are created now.
Logo Finished: Now the stylish business logo has finally created! Well you can accompany it with modern style Sans Serif fonts as logo type. In here, I use Myriad Pro.

Part 2: Techie Background
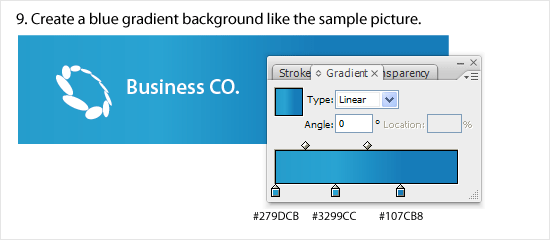
Step 9: Now it’s time to create the techie background. Create a rectangular shape behind the business logo which I colored it to white now with gradient color shown in picture below.
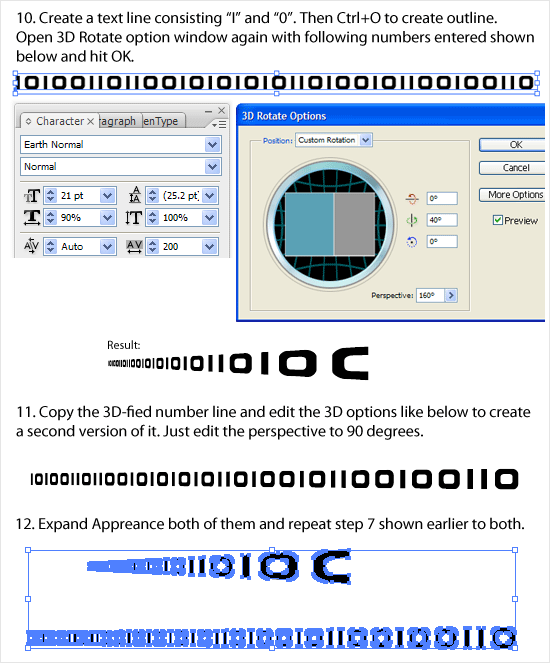
Step 10: We need to create a text line consists of character “I” and “0”. I found a font that looks sinilar to the sample picture which called Earth. By using this font, type out the text line, don’t type it too short. Once done, create Outline (Ctrl+O) the text and launch 3D Rotate Options again, and entering the values like picture shown below.
Step 11: Duplicate the 3D-fied number line and edit the 3D options to create a second version of it. All the values remain unchanged, but change the Perspective value from 160 to 90.
Step 12: Expand Appearance both of them and repeat Step 7 to both.
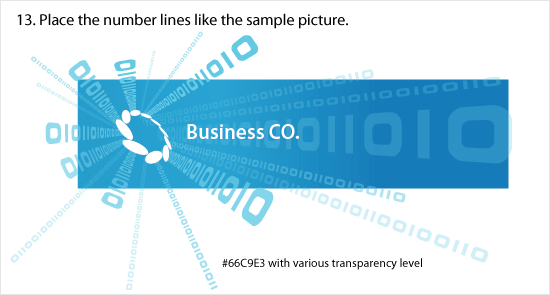
Step 13: Like the sample picture, we place the number lines, giving an illusion of the numbers are coming out from the logo. Color the lines #66c9E3 with verious transparency level, around 30% to 70%. Basically just not too strong until distract the logo.
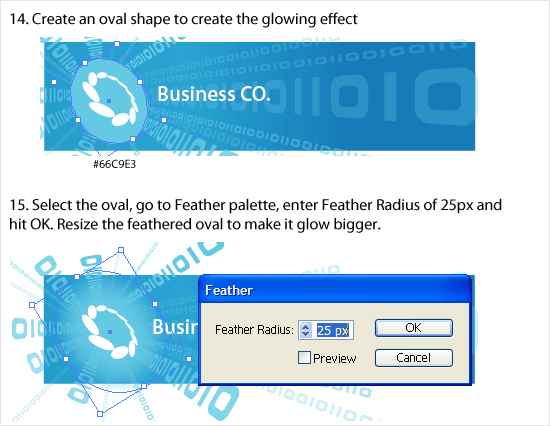
Step 14 & 15: Now we need to create a glow behind the logo. To do this, first create an oval shape, then Feather it with Racius of 25px. Click ok once done. You can adjust the size of the oval to make it a bigger glow. Make sure it fully glows over the logo.
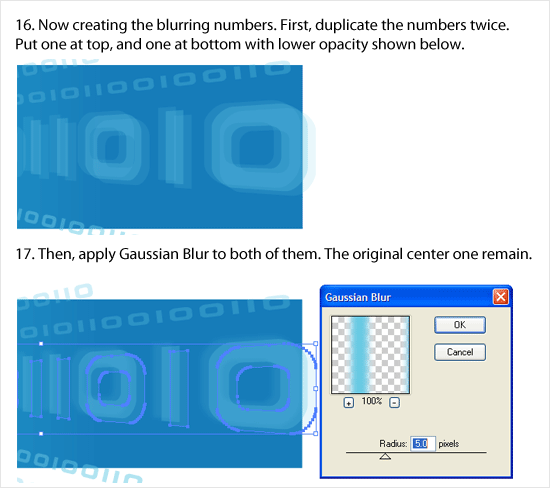
Step 16: We are getting close to final! Well, now by refering to the sample pic, there is one line that is slightly blurred. To do this, we duplicate the number line twice and place one on top and one at bottom of the original like picture below.
Step 17: Once done, apply Gaussian Blur (Effect > Blur > Gaussian Blur) to both of them, with value of 5.0. Click OK to finish.
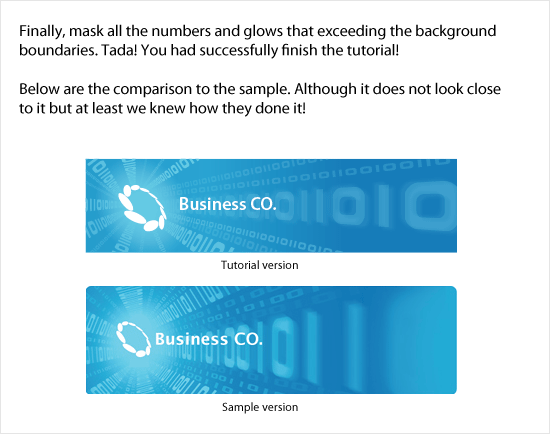
Final step: Finally, mask all the numbers and glow that exceeding the background rectangular. And now the tutorial has finally comes to the end! Let’s compare the Stylish Business Logo with Techie Background that created just now with the sample picture. Although it does not look close to it but hey, at least we knew how they done it! Basically this is it, hope you enjoy this lengthy tutorial! 😀
